Roar With Style: 14 Nail Designs Inspired By Animal Prints
Animal prints have been a popular trend in fashion for decades and have also made their way into the world of nail design.
Do you want to try something new on your long nails or coffin nails? There are excellent options, from classic leopard spots to bold zebra stripes and even more exotic designs like snake or tiger prints.
With step-by-step instructions and tips, we can help you create stunning animal print nail designs in no time. Unleash your inner wild child and get ready to roar with style!
Table Of Contents
- Cultural Significance Of Animal Print Nail Designs
- Cool Animal Print Nail Designs
- Play With Different Color And Shapes
Cultural Significance Of Animal Print Nail Designs
In many cultures, animals hold symbolic meaning and are seen as representations of strength, power, and grace. For example, leopard and cheetah prints are often associated with confidence and boldness. On the other hand, zebra and giraffe prints represent uniqueness and individuality.
Animal prints also have a rich cultural history. In African cultures, animal prints have been used for centuries to create their traditional clothing and accessories. Today, the whole world is adapting to this trend and using these prints in various forms of fashion, including apparel, accessories, and of course, nails.
In addition to their cultural significance, animal prints are versatile and timeless. They can be worn on all occasions, like casual and formal settings, and their classic appearance always stays in style. Animal print nails are not just a passing trend but hold significant cultural value and symbolism.
Cool Animal Print Nail Designs
You must have heard of leopard, cheetah, butterfly, zebra, and tiger print nail designs. Here are some different and rare collections of animal print nail designs and step-by-step instructions to recreate that style.
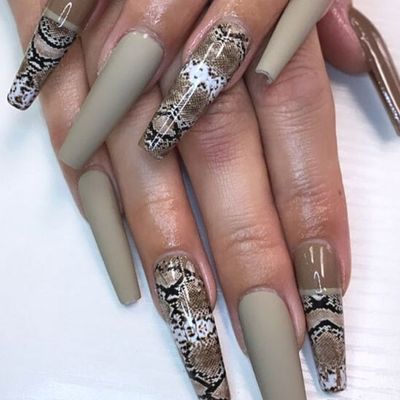
1. Snake Print Nails
Recreate a snake-skin pattern using shades of green and brown.
Here is a simple step-by-step guide on how to create this cool animal print nail design at home.
Materials Required:
- Base coat
- Top coat
- Green nail polish
- Black nail polish
Step 1: First, prepare your nails using essential tools. Then, apply a base coat.
Step 2: Apply the base color. Using green nail polish, paint the entire surface of your nails. Allow the polish to dry completely.
Step 3: Create the snake scales. Using black nail polish and a striper brush, draw curved lines on your nails to create the appearance of snake scales. Finally protect the entire design with a top coat.
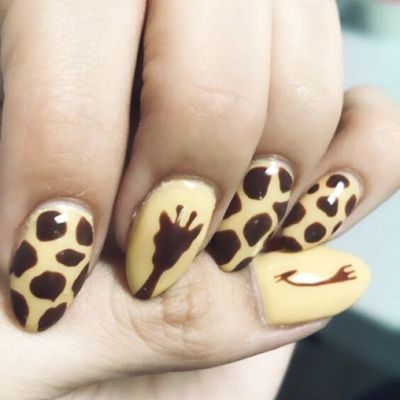
2. Giraffe Print Nails
Create this animal print nail design using spots of yellow, brown, and black.
DIY giraffe print nails with this simple step-by-step guide.
Materials Required:
- Base coat
- Top coat
- Yellow nail polish
- Brown nail polish
Step 1: Prepare your nails and apply a base coat.
Step 2: Apply the base color. Using yellow nail polish, paint the entire surface of your nails and allow them to dry completely.
Step 3: Create the giraffe spots. Using brown nail polish and a striper brush or a fine brush, paint circular spots on your nails to create the appearance of giraffe fur. Make sure to vary the size and shape of the spots to create a more natural look. Finally protect the entire design with a top coat.
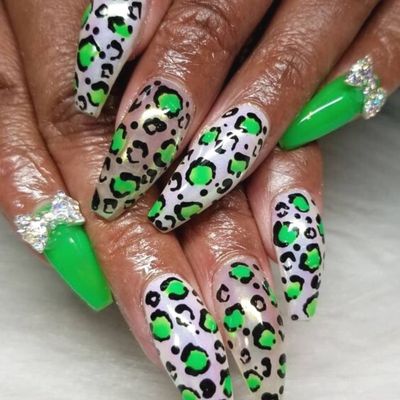
3. Dalmatian Print Coffin Nails
Use black spots on a green background to create this playful animal print nail design.
Try DIY dalmatian print coffin nails through this simple step-by-step guide.
Materials Required:
- Base coat
- Top coat
- Green nail polish
- Black nail polish
- Striper brush or a fine brush
Step 1: Prepare your nails and apply a base coat.
Step 2: Using green nail polish, paint the entire surface of your coffin-shaped nails.
Step 3: Create the dalmatian spots. Using black nail polish, paint small, circular marks on your nails to create the appearance of dalmatian fur.
Step 4: Clean up and apply the topcoat.
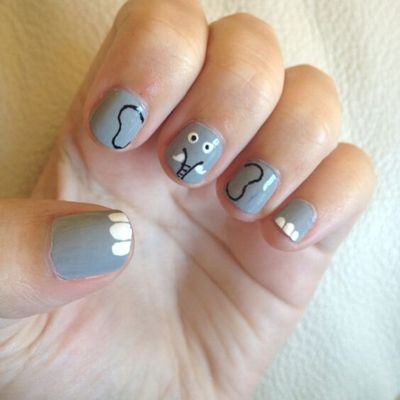
4. Elephant Print Nails
Use light gray and dark gray polish to create an elephant print design.
Try this adorable cute animal print nail design with this step-by-step guide.
Materials Required:
- Base coat
- Top coat
- Gray nail polish
- Black nail polish
- Striper brush or a fine brush
Step 1: Do the nail preparation and apply a base coat.
Step 2: Using gray nail polish, paint the entire surface of your nails.
Step 3: Using black nail polish, draw face, horns, foot, and other characteristic wrinkled patterns of an elephant’s skin on your nails.
Step 4: Clean up and apply the topcoat.
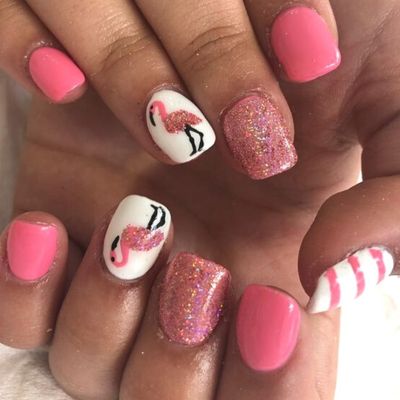
5. Flamingo Print Nails
Use pink and white shades to create a fun flamingo print design.
Try this animal print nail design from your comfort with these simple steps.
Materials Required:
- Base coat
- Top coat
- Pink nail polish
- White nail polish
- Striper brush or a fine brush
Step 1: Prepare your nails and apply a base coat.
Step 2: Paint the entire surface of your nails using white nail polish.
Step 3: Draw a flamingo design using pink nail polish and a striper brush. Paint the distinctive neck and head feathers of a flamingo on your nails.
Step 4: Clean up and apply the top coat.
6. French Jaguar Print Nails
Use a combination of black and yellow shades to create a jaguar print design.
Try this bold and stylish animal print nail design with the following steps.
Materials Required:
- Base coat
- Top coat
- Yellow or gold nail polish
- Black nail polish
- Striper brush or a fine brush

Step 1: Prepare your nails and apply a base coat.
Step 2: Using white nail polish, paint a classic French tip on the tips of your nails. Make sure the white end is even and smooth.
Step 3: Using black and yellow nail polishes and a striper brush, paint the distinctive black rosettes of a jaguar on the white tips of your nails.
Step 4: Finally clean up and apply the topcoat.
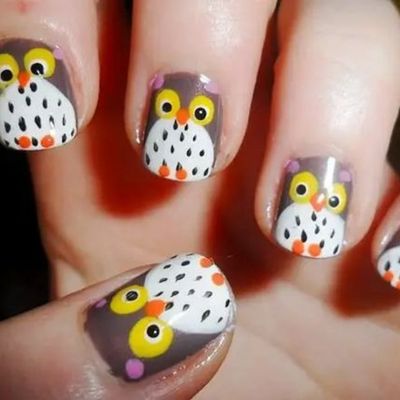
7. Owl Print Nails
Use a mixture of brown, white, and black shades to create a cute owl print.
You can try this cute animal print nail design on your own. Here are the simple steps and materials required.
Materials Required:
- Base coat
- Top coat
- Light brown or beige nail polish
- White nail polish
- Black nail polish
- Striper brush or a fine brush
Step 1: Prepare your nails using essential tools and apply the base coat.
Step 2: Paint your nails using brown or beige nail polish.
Step 3: Now, draw distinctive black circles of an owl’s eyes on your nails using black nail polish and a striper brush. Make sure to paint the eyes in the center of your nails.
Step 4: Using white nail polish and a fine brush, add the white highlights to the center of the black circles to create the appearance of pupils.
Step 5: Clean the skin around your nails and apply a base coat.
8. Monkey And Banana Print Nails
Use a combination of brown, black, yellow, and white to create a playful animal print nail design.
Material Required:
- Base and top coat
- Nail polish (brown, black, yellow, and beige)
- Small brush or toothpick
- Tape or liquid latex

Step 1: Prepare your nails by cleaning them and applying a base coat.
Step 2: Apply your white base color for the background of the monkey and banana design. Let it dry completely.
Step 3: Use tape or liquid latex to protect your skin from getting any polish.
Step 4: For the monkey design, use a small brush or toothpick to draw the shape of a monkey’s face and body. Fill in the details with black or brown polish. You can also use other colors to create the monkey’s features, such as the eyes, nose, and mouth.
Step 5: For the banana design, use yellow polish and a small brush or toothpick to draw a curved shape for the banana. Add a stem and some details with green polish.
Step 6: Once the designs are dry, apply a top coat to seal them.
Step 7: Remove the tape or liquid latex.
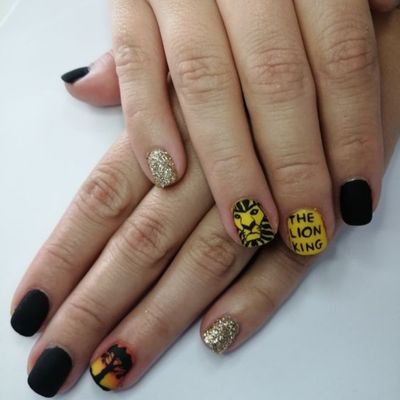
9. Lion Print Acrylic Nails
Use a combination of yellow and brown shades to create a fierce lion print.
Here’s how you can create lion print acrylic nails:
Materials Required:
- Acrylic nails
- Nail file
- Nail buffer
- Nail primer
- Nail glue
- Base and top coat
- Nail polish (yellow and brown)
- Small brush or toothpick
- Tape or liquid latex (to protect your skin)
Step 1: Prepare your nails by filing and buffing them.
Step 2: Apply a primer to ensure that the acrylic nails adhere correctly to your natural nails.
Step 3: Apply a small amount of nail glue to the back of each acrylic nail and press it onto your natural nail, starting at the cuticle and moving toward the tip. Repeat for all ten nails.
Step 4: Use a nail file to shape and refine the nails as desired.
Step 5: Apply a base coat and let it dry completely.
Step 6: Use tape or liquid latex to protect your skin from getting any polish on it.
Step 7: For the lion design, use a small brush or toothpick to draw the shape of a lion’s face and mane. Fill in the details with yellow, brown, or orange polish. You can also use brown color to create the lion’s features, such as the eyes, nose, and mouth.
Step 8: Once the design is dry, apply a top coat to seal the design and protect it.
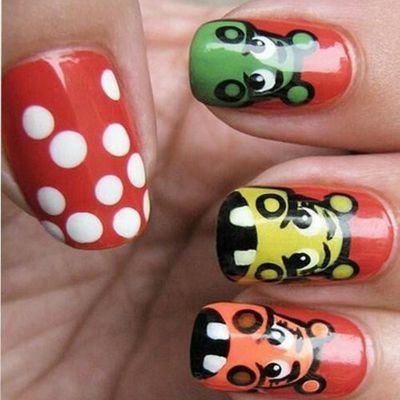
10. Hippo Print Nails
Use light gray, dark gray, and white nail polish to create a hippopotamus print.
Here’s how you can create this red animal print nail design:
Materials Required:
- Base and top coat
- Nail polish (red, yellow, orange, pink, and black)
- Small brush or toothpick
- Tape or liquid latex (to protect your skin)
Step 1: Prepare your nails.
Step 2: Apply your base color, red, for the background of the hippo design. Let it dry completely.
Step 3: Use tape or liquid latex to protect your skin from getting any polish.
Step 4: For the hippo design, use a small brush or toothpick to draw the shape of a hippo’s head. Fill in the details with orange, yellow, or pink polish. You can also use other colors to create the hippo’s features, such as the eyes, nose, and mouth.
Step 5: Once the design is dry, apply a top coat to seal the design.
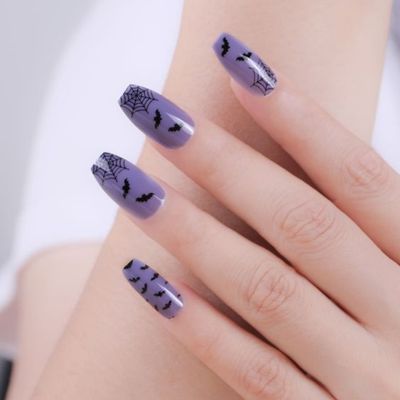
11. Bat Print Nails
Use black and purple to create this purple animal print nail design.
Here’s how you can create purple bat print nails:
Materials Required:
- Base and top coat
- Nail polish (in purple and black)
- Small brush or toothpick
- Tape or liquid latex
Step 1: Prepare your nails by cleaning them and applying a base coat.
Step 2: Apply a purple base color for the background of the bat design. Let it dry completely.
Step 3: Use a small brush or toothpick and black polish to draw the shape of a bat’s wings and body. You can also add details such as the eyes and fangs.
Step 4: Apply a top coat to seal the design.
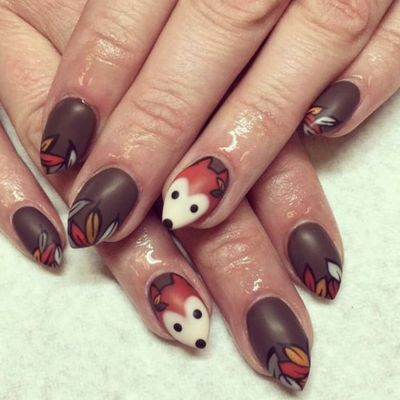
12. Fox Print Nails
Use a combination of orange, brown, black, and white to recreate this fox print.
Here’s how you can create this animal print nail design:
Materials Required:
- Base and top coat
- Nail polish (orange, brown, black, and white)
- Small brush or toothpick
Step 1: Prepare your nails.
Step 2: Apply your base color, brown, for the background of the fox design. Let it dry completely.
Step 3: For the fox design, use a small brush to draw the shape of a fox’s face and body. Fill in the details with orange, white, or black polish. You can also use other colors to create the fox’s features, such as the eyes, nose, and mouth.
Step 4: Once the design is dry, apply a top coat.
13. Horse Print Nails
Use nude, white, and black colors to create a horse print design.
Here’s how you can create this animal print nail design.
Materials Required:
- Base and top coat
- Nail polish (in black and white)
- Small brush or toothpick
- Tape or liquid latex
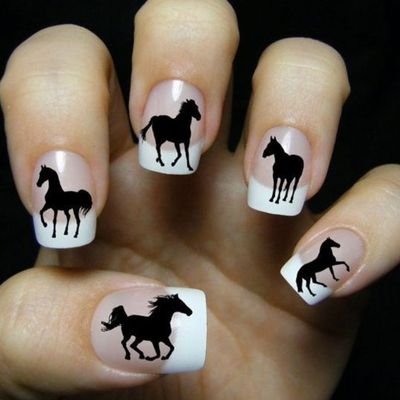
Step 1: Prepare your nails.
Step 2: Apply a white base color for the background of the horse design. Let it dry completely.
Step 3: Use a small brush and black polish to draw the shape of a horse’s body.
Step 4: Once the design is dry, apply a top coat.
14. Deer Print Nails
Here’s how you can create white and brown deer print nails:
Materials Required:
- Base and top coat
- Nail polish (in white and brown)
- Small brush or toothpick
- Tape or liquid latex (to protect your skin)
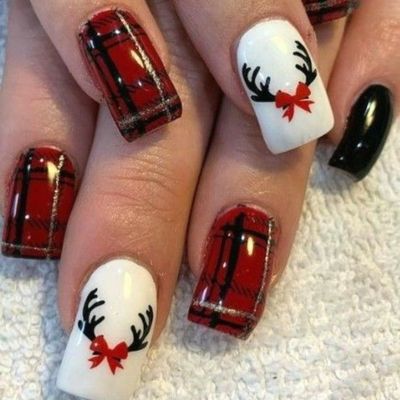
Step 1: Prepare your nails by cleaning them and applying a base coat.
Step 2: Apply a white base color for the background of the deer design. Let it dry completely.
Step 3: Use a small brush and brown polish to draw the shape of a deer’s horn and a bow.
Step 4: Once the design is dry, apply a top coat to seal the design and protect it.
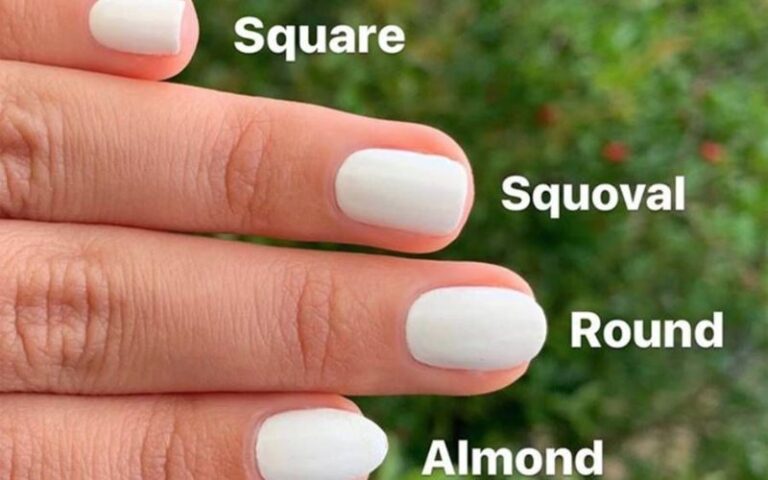
Play With Different Color And Shapes
Try different nail shapes, sizes, and colors to create more innovative looks. If you have long nails, the possibilities are endless. Give one of these nail designs a try to take your nail work to the next attractive level!!!
FAQs
Q: What colors are best for animal print nail designs?
A: Typically, neutral colors such as black, white, brown, and beige are the best options for animal print nail designs. However, you can also add a pop of color to make the design stand out more.
Q: Can animal print nail designs be worn for formal occasions?
A: Yes, animal print nail designs can be worn for formal occasions as long as the design is subtle and not too bold. A minimalist approach can make the design look elegant and sophisticated.
References
- 15 Super Fun Leopard Nail Designs To Try: https://www.collegefashion.net/beauty-and-hair/leopard-nail-designs/
- 50 Stylish Leopard And Cheetah Nail Designs: https://forcreativejuice.com/stylish-leopard-and-cheetah-nail-designs/
- 215 Animal Print Nail Art Designs With Latest Ideas: https://bodyartguru.com/animal-print-nail-art/
- Animal Print Nails Are This Season’s Sexiest Mani: https://www.glamourmagazine.co.uk/article/modern-animal-print-nail-trend